Integrating Google OAuth2 login in an Angular application enhances user experience by enabling seamless, secure authentication. In this guide, we’ll walk through the process of implementing Google OAuth2 Login using the Angular OAuth2 OIDC library.
Prerequisites
Before we start, ensure you have the following:
- Node.js and npm installed
- Angular CLI installed (
npm install -g @angular/cli) - A basic Angular application setup
- A Google Cloud account to create OAuth credentials
Step 1: Setting Up Google OAuth Credentials
- Visit Google Cloud Console: Go to Google Cloud Console.
- Create a New Project:
- Navigate to the “Project Selector” menu.
- Click New Project and provide a project name.
- Enable APIs and Services:
- Go to “APIs & Services” > “Library”.
- Search for Google People API and enable it.
- Create OAuth Credentials:
- Navigate to “APIs & Services” > “Credentials”.
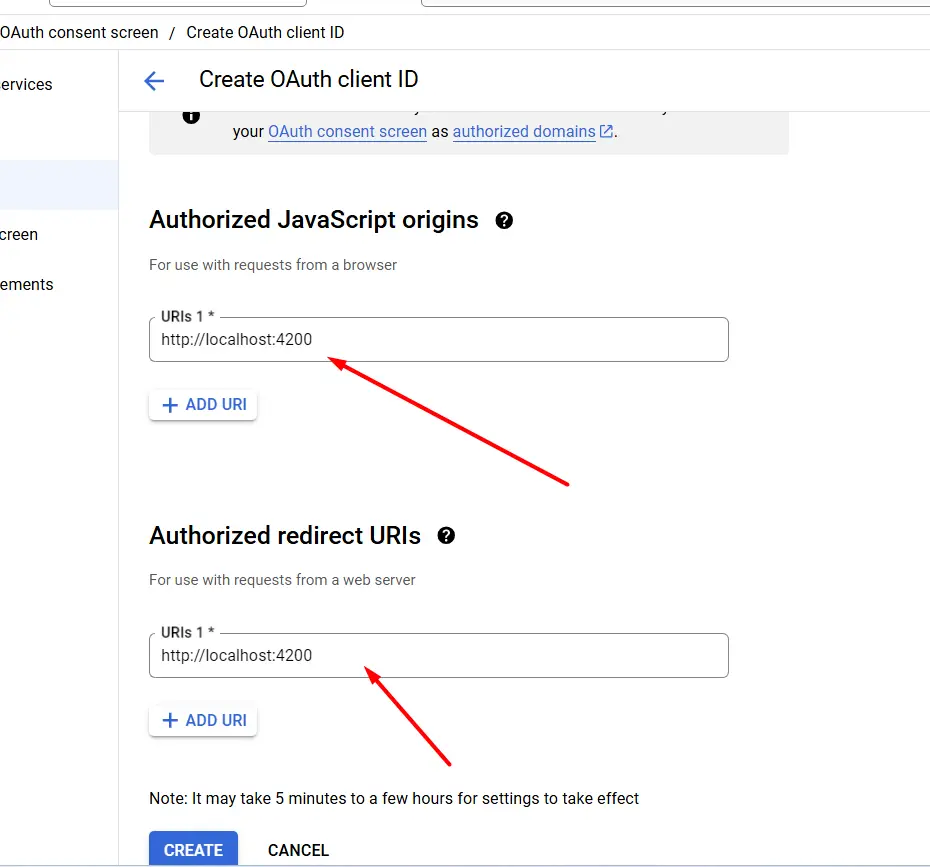
- Click Create Credentials > OAuth 2.0 Client ID.
- Select “Web application” as the application type.
- Add your redirect URI (
http://localhost:4200for development).
- Copy Client ID and Secret:
- Save your Client ID and Client Secret for later use.
Step 2: Install Angular OAuth2 OIDC Library’
Install the required library in your Angular project:
|
1 |
npm install angular-oauth2-oidc |
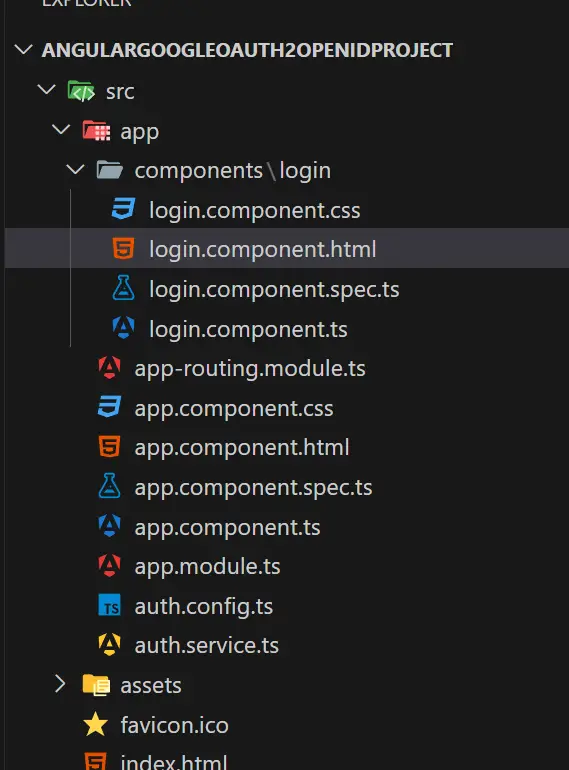
Directory Structure of App
Step 3: Configure the OAuth2 Module
In your Angular project, configure the OAuth2 library to use Google as the identity provider.
- Import Required Modules: Update the
AppModuleto include the OAuth2 configuration inapp.module.tsfile
|
1 2 3 4 5 6 7 8 9 10 11 12 13 14 15 16 17 18 19 20 21 22 23 24 |
import { NgModule } from '@angular/core'; import { BrowserModule } from '@angular/platform-browser'; import { AppRoutingModule } from './app-routing.module'; import { AppComponent } from './app.component'; import { LoginComponent } from './components/login/login.component'; import { HttpClientModule } from '@angular/common/http'; import { OAuthModule } from 'angular-oauth2-oidc'; @NgModule({ declarations: [ AppComponent, LoginComponent ], imports: [ BrowserModule, AppRoutingModule, HttpClientModule, OAuthModule.forRoot(), ], providers: [], bootstrap: [AppComponent] }) export class AppModule { } |
Set Up the Configuration in a Service: Create an auth-config.ts to manage OAuth settings.
|
1 2 3 4 5 6 7 8 9 |
import { AuthConfig } from 'angular-oauth2-oidc'; export const authConfig: AuthConfig = { issuer: 'https://accounts.google.com', redirectUri: window.location.origin, clientId: '', strictDiscoveryDocumentValidation: false, scope: 'openid profile email', }; |
Step 4: Initialize Authentication
- Modify AppComponent: Update the
AppComponentto initialize the authentication process.
|
1 2 3 4 5 6 7 8 9 10 11 12 13 14 15 16 17 18 19 20 21 22 |
<div class="container mx-auto p-4"> <h1 class="text-3xl font-bold mb-4">Google OAuth2 Login Example</h1> <div *ngIf="isLoggedIn"> <div class="card"> <img [src]="userProfile.picture" alt="Profile Picture" /> <div class="container"> <h4><b>{{ userProfile.name }}</b></h4> <p>{{ userProfile.email }}</p> </div> </div> <button class="bg-red-500 hover:bg-red-700 text-white font-bold py-2 px-4 rounded" (click)="logout()"> Logout </button> </div> <div *ngIf="!isLoggedIn"> <button class="bg-blue-500 hover:bg-blue-700 text-white font-bold py-2 px-4 rounded" (click)="login()"> Login with Google </button> </div> </div> |
The typescript code for the above component is as shown below. First of all make the auth.service.ts file as well and copy paste the below code
auth.service.ts
|
1 2 3 4 5 6 7 8 9 10 11 12 13 14 15 16 17 18 19 20 21 22 23 24 25 26 27 28 29 30 31 32 33 34 35 36 37 38 39 40 41 42 43 |
import { Injectable } from '@angular/core'; import { OAuthService } from 'angular-oauth2-oidc'; import { authConfig } from './auth.config'; import { HttpClient } from '@angular/common/http'; @Injectable({ providedIn: 'root', }) export class AuthService { constructor(private oauthService: OAuthService, private http: HttpClient) { this.configure(); } private configure() { this.oauthService.configure(authConfig); this.oauthService.loadDiscoveryDocumentAndTryLogin(); } login() { this.oauthService.initLoginFlow(); } logout() { this.oauthService.logOut(); } get identityClaims() { return this.oauthService.getIdentityClaims(); } get accessToken() { return this.oauthService.getAccessToken(); } get userProfile() { const url = 'https://www.googleapis.com/oauth2/v2/userinfo'; return this.http.get(url, { headers: { Authorization: `Bearer ${this.accessToken}`, }, }); } } |
Now we can import this auth.service.ts file in the typescript code for the component as shown below
|
1 2 3 4 5 6 7 8 9 10 11 12 13 14 15 16 17 18 19 20 21 22 23 24 25 26 27 28 29 30 31 32 33 |
import { Component } from '@angular/core'; import { AuthService } from '../../auth.service'; @Component({ selector: 'app-login', templateUrl: './login.component.html', styleUrls: ['./login.component.css'], }) export class LoginComponent { userProfile: any; constructor(private authService: AuthService) {} ngOnInit() { if (this.authService.identityClaims) { this.authService.userProfile.subscribe((profile) => { this.userProfile = profile; }); } } login() { this.authService.login(); } logout() { this.authService.logout(); } get isLoggedIn() { return !!this.authService.identityClaims; } } |
Step 5: Test the Application
- Run the Application: Start the development server:
|
1 |
ng serve |
- Access the Application: Open your browser and navigate to
http://localhost:4200. - Authenticate with Google:
- Click the Login with Google button.
- Sign in with your Google credentials.
- The application should display your name and email address after a successful login.
- Logout: Test the logout functionality to ensure it clears the session.